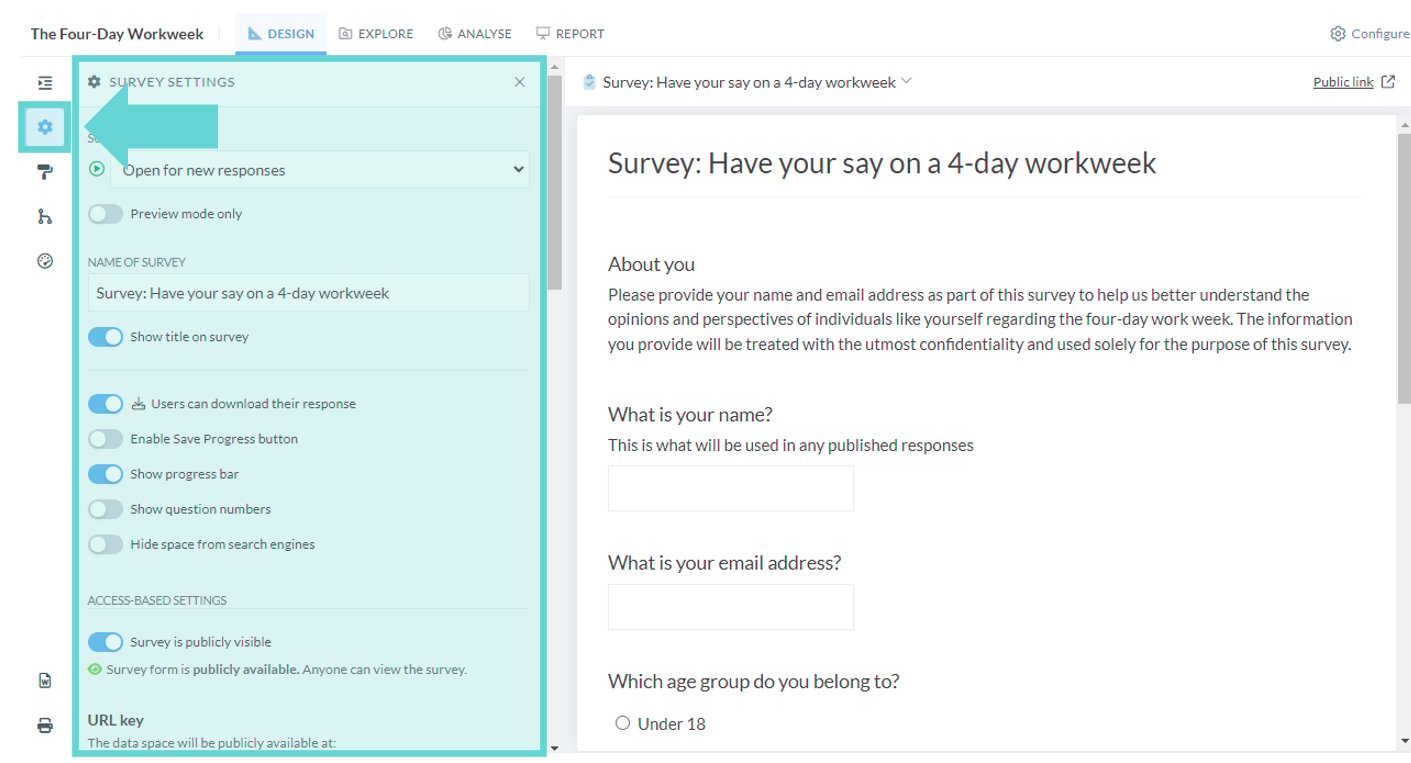
Survey settings
The Build tab will default to the Block settings menu when opened. Click the Survey Settings button to access Survey settings: There are several setting options to edit:- Survey Status
- General Settings
- Access based survey settings
- Response publishing settings
- Custom Messages
- Custom PDF footer
- Danger zone
Survey Status
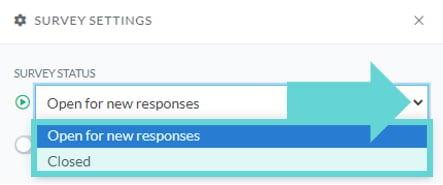
Survey Status
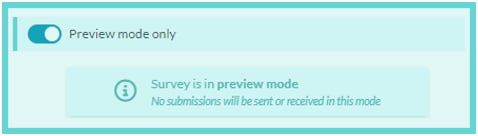
The Survey Status option lets you control whether the selected survey is open for new responses or closed to further submissions. To update the status, click the dropdown arrow and choose the desired option. After making your selection, click the “Save” button at the bottom of the survey settings panel to apply the change.Preview Mode Only
General Settings
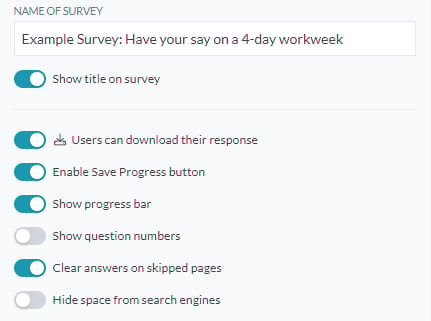
Name of survey
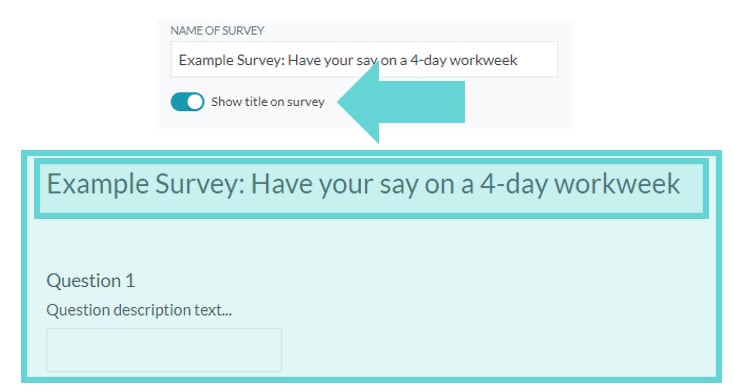
Click inside the text box to edit the survey title. This title will be visible to respondents on the front end. Once you’re satisfied with the title, click “Save” in the bottom corner of the settings panel to apply your changes.Show title on survey
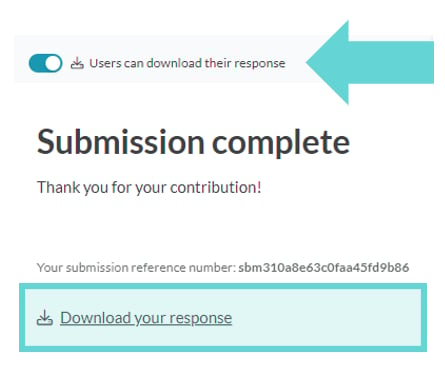
Use the toggle to show or hide the survey title on the survey page. Switch it “On” to display the title, or “Off” to hide it.Users can download their response
Toggle this option on to allow respondents to download a copy of their completed survey upon submission. Toggle off to disable this feature.Enable Save Progress Button
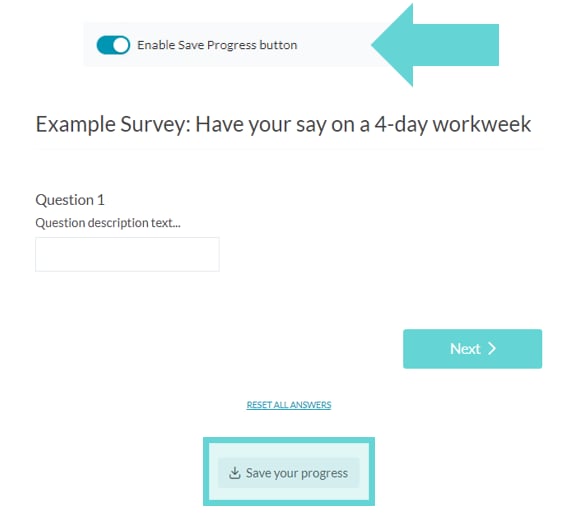
Toggle this option on to allow users to save their responses and return to the survey later, or to save their progress as they go to prevent data loss. When respondents click the “Save Progress” button, they will be prompted to confirm their action on a new page. After confirmation, a custom URL will be displayed for them to copy. They can use this URL to return to their survey at any time from any device. Toggle off to disable this feature. Remember to click “Save” at the bottom of the settings panel to apply your changes.Show Progress Bar
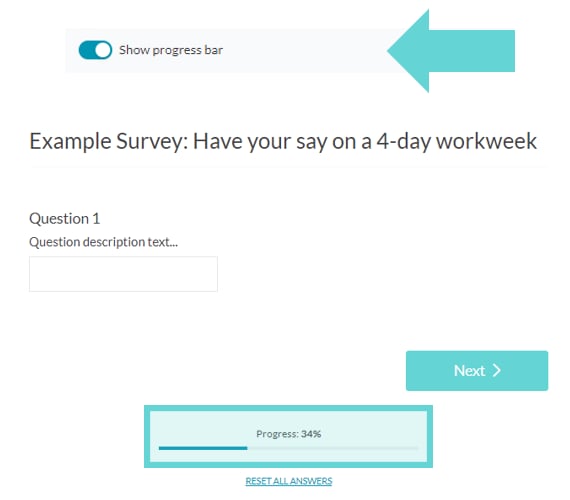
Toggle this option on to display a progress bar at the bottom of each survey page, showing the percentage of completion as respondents answer questions. Toggle off to disable this feature. Remember to click “Save” at the bottom of the settings panel to apply your changes.Show Question Numbers
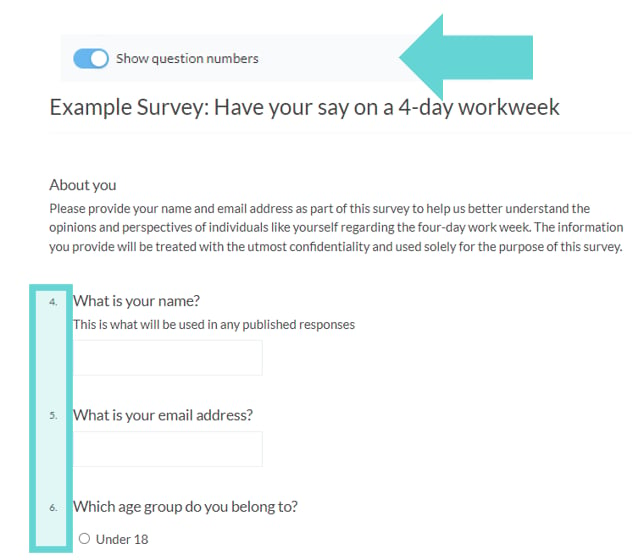
Toggle this option on to display question numbers on each page of your survey. Toggle off to hide question numbers. Remember to click “Save” at the bottom of the settings panel to apply your changes.Limit responses by unique email field
Select an email question if you want to limit each email address to one response. This is useful when your survey should only accept one response from each respondent.Clear answers on skipped pages
When using “Skip logic” in your survey, it’s possible to jump over questions on pages that are inaccessible based on the logic you create. When the option to “clear answers” is on it means that responses to questions on pages that have been skipped are cleared. This is useful if you wish to ensure that pages that are skipped do not have any answers on them. You may wish to turn this off if you’ve set up jumping backwards, as this usually means you’re allowing respondents to answer multiple pages. When this option is off, responses to all questions are preserved, even if respondents have gone back and changed their ‘path’ through your survey. When the option is on, responses on pages that are skippable are cleared, which ensures only the answers for the path your respondents have taken through your survey are preserved.Hide Space from Search Engines
Toggle this option on to prevent your survey from being indexed by search engines like Google. This means the survey will not appear in search results, ensuring it remains private and accessible only to those with the direct link. Toggle off if you want the survey to be searchable. Remember to click “Save” at the bottom of the settings panel to apply your changes.Access based survey settings
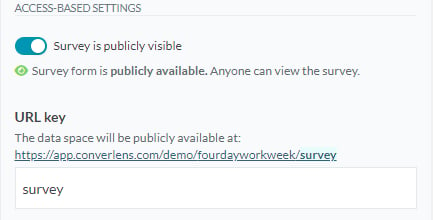
In this section, you can manage the visibility of your survey and customise its URL key to control access and improve sharing.Survey is publicly visible
Toggle this option on to make your survey publicly accessible, allowing anyone to view it. Toggle off to restrict visibility so that only logged-in team members with access to the project or survey can view it. To collect responses from the general public, ensure this option is toggled on.URL Key
This is the customisable part of your survey’s public link, appearing after the last slash. To modify it, enter your preferred text in the text box. Click “Save” to apply your changes. Warning: Changing the URL key will break any existing links to the survey. It is advisable to finalise the URL key before publicising the survey to avoid disrupting access.Response publishing settings
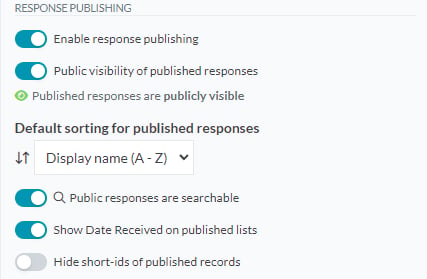
In the Response Publishing section of Survey Settings, you can configure options for allowing survey respondents to publish their responses. This feature is particularly useful for contexts where transparency and accessibility of responses may be required. Note that published responses will be accessible via a public link. Read on to learn how to enable and manage response publishing for your survey. Tip: For more information about publishing survey responses see Publishing settings.Enable response publishing
Toggle this option on to enable response publishing settings for your survey, allowing project admins to review and confirm the publication of responses. Toggle off to disable this feature; if disabled, response publishing options will not be visible on the backend to team members. Project admins will need to enable this setting to access and manage response publishing options if they decide to publish responses later. Once enabled, new options for response publishing settings will appear in the survey settings section.Public visibility of published responses
Toggle this option on to allow public visibility of survey responses. If disabled, published responses won’t be viewable by the public.Default Sorting Options for Published Responses
Select from the dropdown menu to determine how published responses are listed:- Created (new – old): Shows the newest responses at the top, with the oldest at the bottom.
- Created (old – new): Displays the oldest responses at the top, with the newest at the bottom.
- Display Name (A – Z): Arranges responses alphabetically from A to Z.
- Display Name (Z – A): Sorts responses in reverse alphabetical order from Z to A.
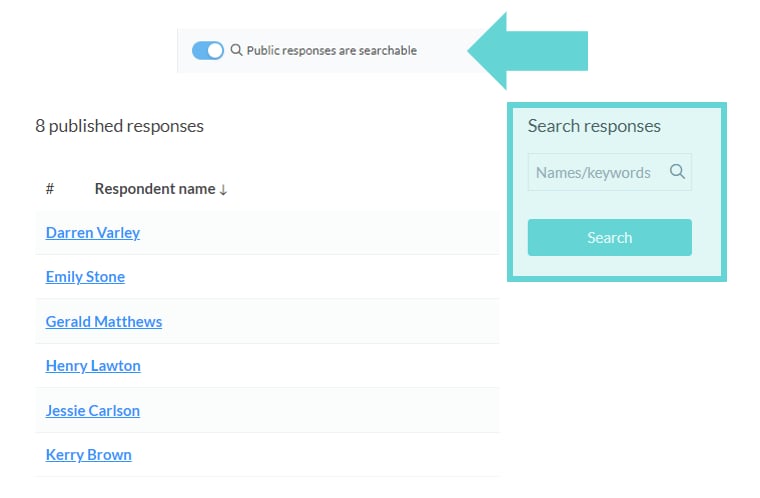
Public responses are searchable
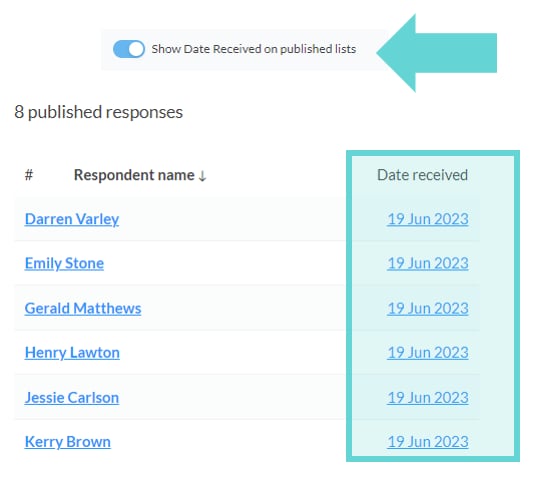
Toggle this option on to allow published public responses to be searchable. When enabled, users can search for specific responses within the public view. Toggle off to disable the search functionality for published responses. Remember to click “Save” at the bottom of the settings panel to apply your changes.Show Date Received on published lists
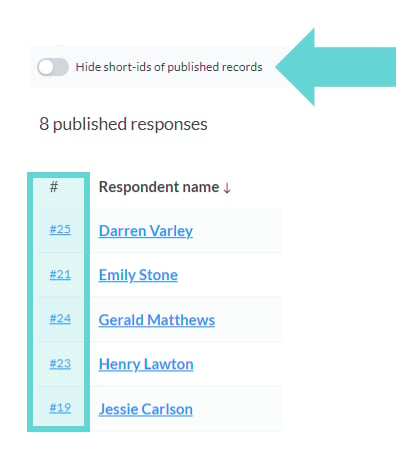
Toggle this option on to display the date each response was received in the list of published responses. Toggle off to hide the date from the published list. Remember to click “Save” at the bottom of the settings panel to apply your changes.Hide short-ids of published records
Toggle this option on to hide the submission ID numbers from the published records. Toggle off to display the short-IDs alongside the published responses. Remember to click “Save” at the bottom of the settings panel to apply your changes.Custom Messages
In this section, you can set up personalised messages to enhance the survey experience at various stages. Customise the text for published record listings, successful submissions, survey closure, and quota exceedance to better communicate with your respondents. Click into the text box of the message you want to edit and use the Rich Text Editor (RTE) to format your messages with options for paragraph styles, headings, lists, block quotes, bold, italic, links, images, and file attachments. After entering your custom text for each message type, click “Save” to apply your changes.Published record preamble text
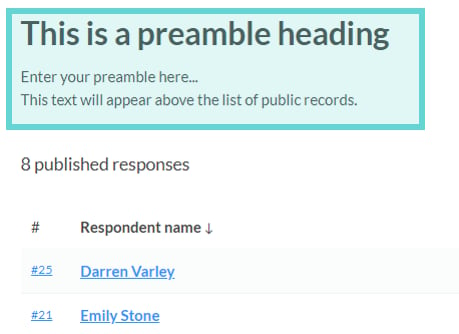
Optional text to display above the list of published records. Click into the “Published Record Preamble Text” box to add text above the list of public records. You can use the Rich Text Editor for formatting, links, attachments, and images. This text will display on the published responses public link.Successful submission text
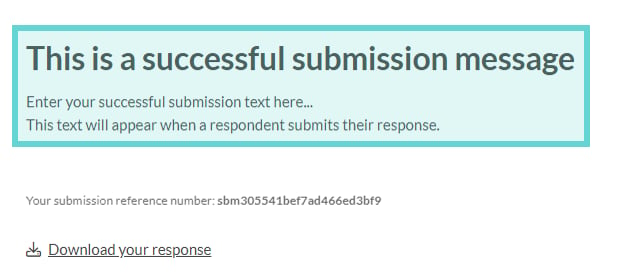
Optional text to display to users on submitting a response. Click into the “Successful submission text” box to add text when a respondent submits their response successfully. You can use the Rich Text Editor for formatting, links, attachments, and images. This text will display when a respondent finishes their survey and clicks “Submit”.Survey closed message
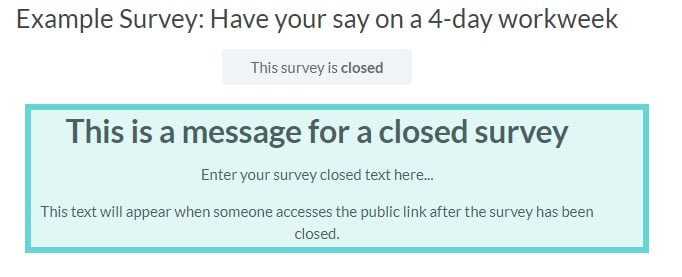
Message to show when survey is closed. Click into the “Survey closed message” box to edit the text that displays on the public link when the survey is closed. You can use the Rich Text Editor for formatting, links, attachments, and images. This text will display when a respondent clicks the public survey link when the Survey Status is set to “Closed”.Quota exceeded message