About Data Importer

Where to find Data Importer
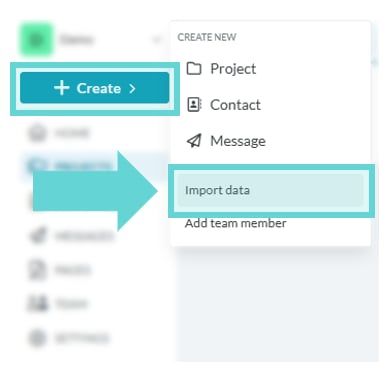
Open the Workspace Sidebar and click Create > Import data to open Data Importer.Uploading Data
Add data file: If you haven’t added any data yet, click on “Add Data Source File” located in the centre of the screen. You can also add a data source file at any time by clicking the “Add Data Source File” button in the top right-hand corner. File type requirement: Ensure the file type you are uploading is a CSV (comma separated values) file type.Preparing Your Data for Import
To ensure a smooth import process:- Ensure a clean CSV format: Questions should be in the first row, with data in rows below.
- Limit large files: Performance is best with fewer than 100 columns (questions) and 10,000 rows (responses).
- Remove extra rows: Avoid multiple header rows, as Converlens relies on the first row for questions and the rows below for data. If additional header rows exist, the importer will interpret them as responses instead of questions.
- Check formatting: Ensure date, text, and numerical data are consistent.
- Use “No Data” toggle: After uploading your CSV, enable this option to hide and exclude columns with no data, preventing the import of empty questions or blocks.
Conform Data
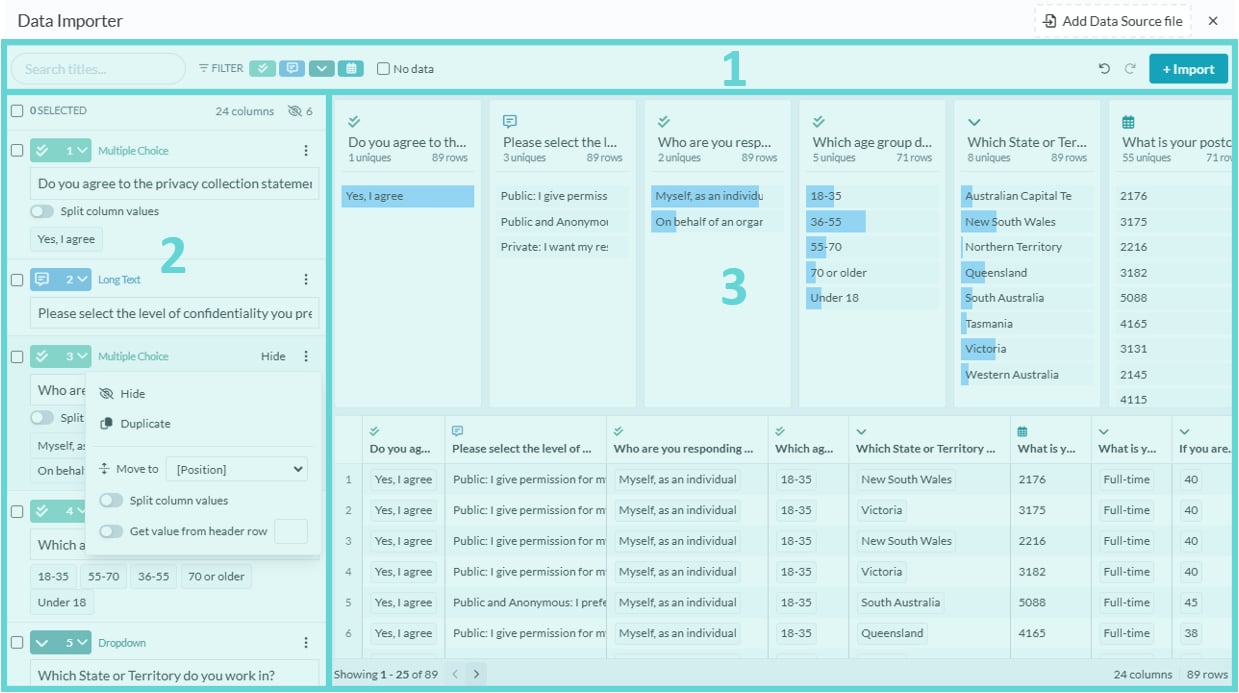
Once your data is uploaded, the importer provides several tools to review and refine it. For clarity, this guide divides the Importer page into three main sections:- Toolbar: Search for specific questions, filter block types, hide empty columns, undo and redo changes, and import data.
- Block Editor: Interact with blocks and change settings including block type, column values, and position.
- Data Preview: Click to select or deselect blocks to combine, hide, or bulk change block type, and view your data in a structured table format.
Toolbar
The toolbar provides functions to refine and manage your imported data before finalising the upload. Use these tools to search, filter, adjust visibility, undo/redo actions, and complete the import process.- Search: Enter text in the search bar to find specific question titles in your uploaded CSV
- Filter: Click the filter icons to display only certain block types (e.g., questions or row headers from your CSV). This helps confirm that each question has been imported with the correct block type, matching the format you want in Converlens.
- No Data: Toggle this option to show or hide columns that contain no data. It’s recommended to hide empty columns (which won’t be imported) to avoid blank questions with no responses in your Converlens data space.
- Undo / Redo: Click the back arrow to undo your last action or the forward arrow to redo a previous action.
- Import: Once your data is correctly formatted and ready for upload, click Import to open the Import Preview and Confirmation window.
Block Editor
The Block Editor allows you to interact with individual blocks, adjust their settings, and manage their placement within your data.- Select: Click the checkbox to select a block. This highlights the block in the Data Preview and enables the Bulk Edit menu.
- Hide: Hover over a block or click the ⋮ more options menu to reveal the Hide option. Click Hide to remove the block from the Data Preview (it will not be imported). Click Unhide to restore it.
- More Options (⋮ Menu) – Click the three-dot menu for additional functions:
- Duplicate: Creates a copy of the selected column.
- Move to [Position]: Moves the block to a new position in the data collection (think of this as reordering questions/columns in your CSV)
- Split Column Values: Only available for multiple-choice questions; splits combined values into separate options.
- Get Value from Header Row: Extracts a value from a designated header row.
Bulk Editor
When one or more blocks are selected, the Bulk Editor appears, allowing you to make changes to multiple blocks at once:- Combine: Merge selected columns into a single column (question/block) and combine values.
- Hide: Hide all selected columns (they will not be imported).
- Set Type: Change the block type for all selected blocks/columns at once.
Data Preview
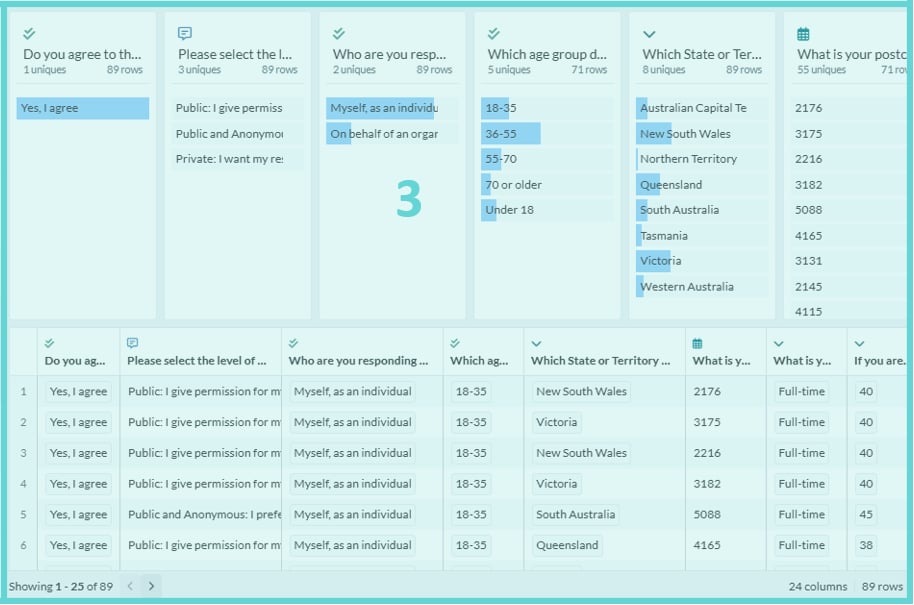
The Data Preview allows you to review your uploaded data in two formats:- Quick View (Top Section): This provides a summary of each column, including:
- Block type: Icon at the top displays the block type allocated to that column.
- Question text: Displays the question or column title from your dataset.
- Inputs/Options: Shows unique values or answer choices found in the column.
- Row Count: Indicates the number of rows with data in that column.
- Data Sample: Provides a quick preview of the responses stored in the column.
- Table View (Bottom Section): Displays the full dataset exactly as it appears in your CSV file. This allows you to verify the accuracy of your responses and ensure all expected data is present before proceeding with import.
Import Data into a Project

- The number of records to import
- The number of questions in your data space (survey)
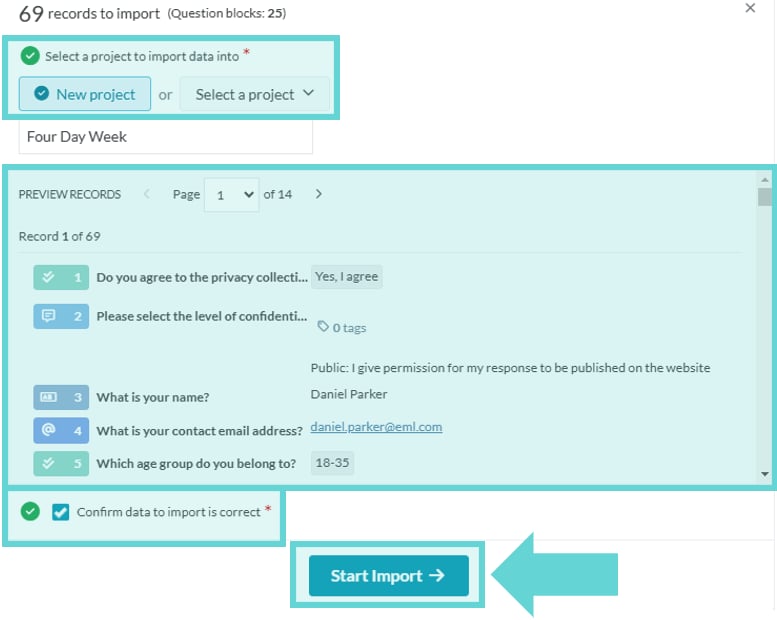
- Select a Project: The importer creates a new data space for the imported data.
- An existing project: The new data space will be added to a project you’ve already created.
- A new project: A new project will be created, and the imported data will be stored in a new data space within it.
- Preview Records: This is the most critical step. The preview displays exactly how responses will appear in Converlens. Review a few records to ensure:
- Data is displayed correctly
- Block types and option choices are as expected
- There are no formatting issues
- If anything looks incorrect, return to the Data Importer to make adjustments before proceeding.
- Confirm Data: Check the confirmation box to verify the data is correct and you are importing into the correct project (existing or new).
- Start Import: Click Start Import to begin importing the data. Once the import is complete, a confirmation message will appear, allowing you to return to the Projects List, where the imported data will be displayed as a new Data Space titled “Data Import on YYYY/MM/DD”.