About Tags
Tags are a powerful tool in Converlens for organising and analysing survey responses. They help categorise data, highlight key insights, and structure qualitative analysis. Think of tags as post-it notes on the front page of a response, telling you at a glance what that response contains. Tags can be thematic and group themes, topics, and areas of interest. Tags can also be used for more administrative tagging (e.g., redaction required, important response, good for a quote etc). In qualitative analysis, tags are a mechanism by which you can turn qualitative insights into quantitative statistics i.e. 10% of respondents to Question 1 talked about Topic A. In Converlens, tags work in two ways:- Tags at the record level: These apply to an entire response, acting as a label for quick identification. Use them to group responses by theme, topic, or administrative needs (e.g., “important response” or “good for a quote”).
- Tags as text “highlights” for deeper analysis: Highlights apply directly to response text, marking specific words or sentences for more detailed topic analysis. Read more about Highlights here.
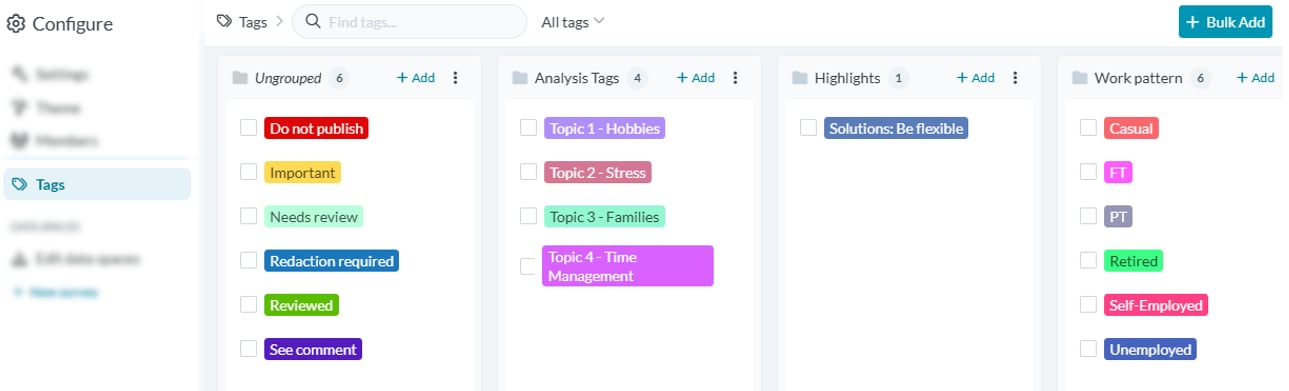
Where to find Tags
There are 3 ways to access the Tag configuration menu, depending where you are in Converlens.- From any Project Navigation Tab: Click Configure (the cog-wheel icon in the top right corner). This will open the Configure menu. Select “Tags” from the Configure menu to open the Tag configuration menu.
- In Explore: Click on the Filter by Tag dropdown. Select “Edit Tags” at the bottom of the window to open the Tag configuration menu
- In Submission Reader: Click on Tag Selector from the right-hand panel. Scroll to the bottom of the tag list and click “Edit Tags” to open the Tag configuration menu
Tag options
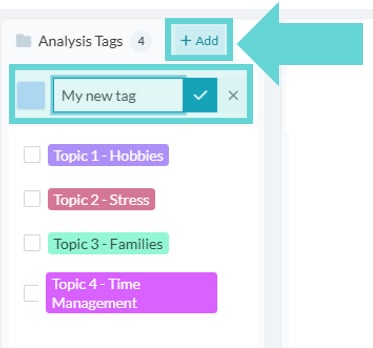
Add a tag
To add a new tag, navigate to the tag group you would like to add the tag to. Click the +Add button on the top right side of the column of the tag group you want to add a tag to. A new tag will appear at the top of the list. The tag colour is randomly generated, but you can select the tag colour here or edit it down the track. Type the tag name into the text box (you can edit this later) and click the blue tick when complete.Rename a tag
To rename a tag, navigate to the tag you would like to edit. Click the 3 dot menu to the right of that tag. A menu will appear. To rename the tag, simply type into the text box and click out of the menu when complete.Change Tag colour
To edit a tag’s colour, navigate to the tag you would like to edit. Click the 3 dot menu to the right of that tag. A menu will appear. Click the coloured box to open the colour selector. From here you can use the slider and selector or enter a HEX code. When complete, simply click ok and click out of the menu to close.Edit multiple tags
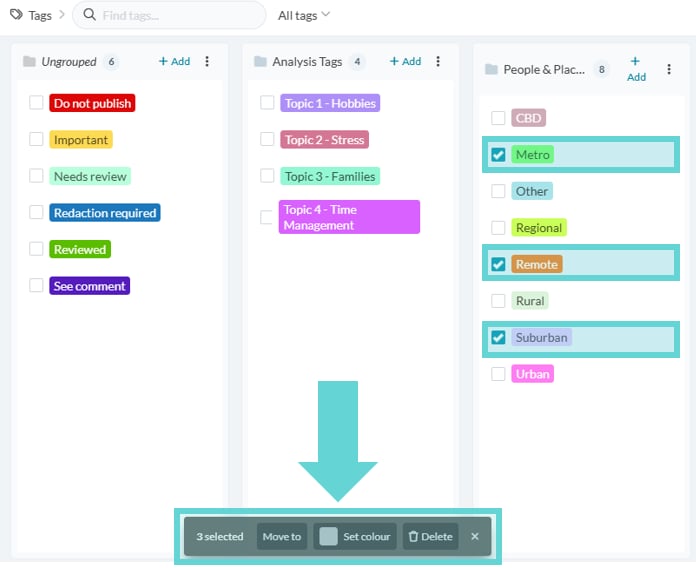
To edit multiple tags, click the check box next to the tags you would like to move, change the colour of, or delete. The bulk editor menu will appear at the bottom of the Tag configuration window. Select the required action and confirm by clicking “OK”. This will apply changes to all the selected tags. Click the x on the select menu to exit bulk editing.Add a new tag group
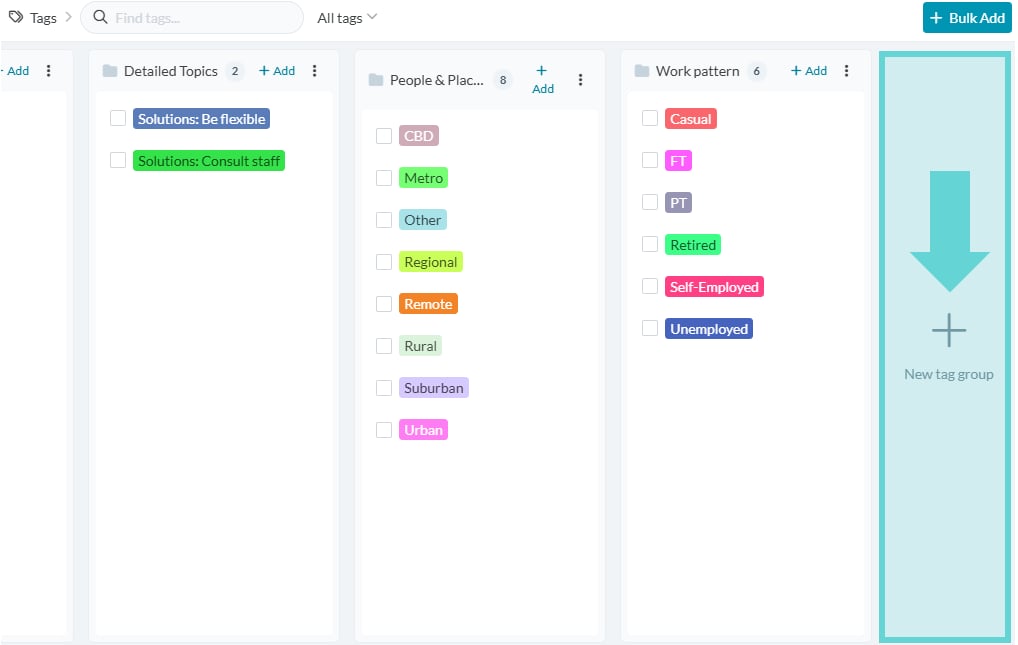
To add a new tag group click the +New tag group box. By default, this box will display to the right of the last tag group column. There are no limits to the amount of tag groups that can be created. Clicking +New tag group will automatically create a blank tag group column. It will display as “New group”. Click the 3 dot menu at the top of the column to edit the tag group name and set a colour for the group (if required).Rename tag group
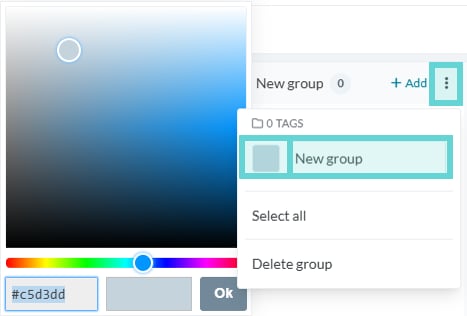
To rename a tag group, click the 3 dot menu on the top right side of the column of the tag group you want to edit. A popup will show the settings for the tag group. Click into the text box (showing New group as default) and enter the required group name. The tag group name will automatically update as you type. When finished, simply click out of the menu.Colour tag group
Tag groups can be coloured for ease of reference. These colours will carry through to the Explore view and can improve usability for analysts when there are large amounts of tags or survey responses. To change the background colour of the tag group, click the 3 dot menu on the top right side of the column of the tag group you want to edit. From the pop-up menu, select the box next to the tag group title text box. By default this will show as a grey box. A colour selector will appear, and from here you can select a colour or enter a HEX code. When you’re happy with your choice, click okay and the tag group will display that colour. When finished, simply click out of the menu.Bulk Adding Tags
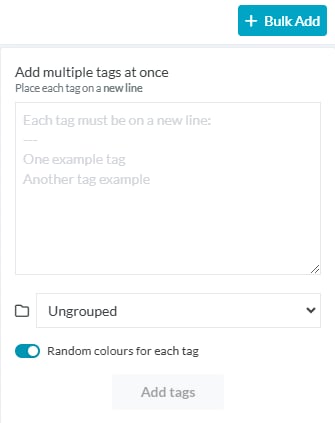
To add multiple tags at once, use the +Bulk Add function. Click the +Bulk Add button in the top right of the window to open the menu.- Type or paste your list of tags into the text box, ensuring each tag is on a new line.
- Select the tag group where the tags should appear.
- Choose whether to assign random colours or select a specific colour.
- Click Add Tags, and the new tags will be added to your selected group.
Move a tag
To move a tag from one group to another, navigate to the tag you would like to edit. Click the 3 dot menu to the right of that tag. A menu will appear. Mouse over the “Move Tag” button to show the list of tag groups. Click on the tag group you would like to move the tag to and it will appear in that list.Search for a tag
Tags are searchable. Simply type what you’re looking for into the Find tags search box on the right hand side of the window and the view will limit to tags with only those matching. If there are no matches for the search query nothing will display.Delete a tag