- Individual: Manually add a single contact.
- Import from CSV: Upload a list of contacts using a CSV file.
- Import from Existing Projects: Create contacts from participant submissions in existing projects.
Adding an Individual Contact
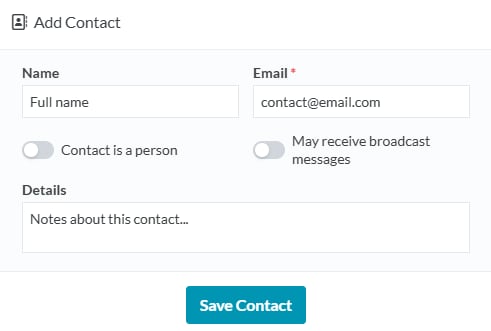
Use this option to add a new contact to your database. You’ll be prompted to enter the following details:- Name: Enter the contact’s name.
- Email: Provide the contact’s email address.
- Contact is a person: Toggle this option on/off to specify whether the contact is a person or organisation.
- Subscriber / May receive broadcast messages: Toggle this on/off to allow the contact to receive broadcast messages.
- Only contacts with this enabled will receive broadcast messages.
- Details: Add any additional information or notes about the contact.
- Save contact: Click to save the new contact and add it to your database.
Import from CSV
To import a list of contacts from a CSV click Import, then select Import from CSV file.- Upload your CSV:
- Drag and drop the file or click to select it from your device.
- Assign Fields:
- Match your CSV column headers to Converlens Contact fields.
- Click the dropdown to assign a field or select Skip if you do not want to import that column.
- Choose Import Options:
- Handling duplicates:
- Choose whether to update existing contacts, fill in missing fields, or leave them unchanged if the email already exists in the database.
- Apply Labels (Optional):
- Select a label to tag imported contacts for better organisation.
- Confirm and Import:
- Review the settings, check the confirmation box, and click Import Contacts. Contacts with invalid email addresses are skipped.
Importing Contacts from Existing Projects
- Choose import settings:
- Set as Subscribers: Check this box to mark imported contacts as subscribers who can receive broadcast messages.
- Set as Registered Members: Check this box to mark imported contacts as registered members.
- Contact creation date: Choose whether to use the current date or the contact’s first submission date.
- Select Projects to Import From:
- All spaces: Import contacts from all data spaces containing an email question block.
- Select specific spaces: Choose specific surveys or data spaces to import contacts from. The selected spaces must contain an email question block.
- Complete the Import:
- Click Import Contacts.
- All respondents matching the selected import settings who provided an email address in their response will be added as contacts.